5. Questionnaires
Questionnaires let you build step-by-step conversational forms and deploy them as a web embed, via WhatsApp, or as an AI-powered voice call. Each questionnaire is a graph of connected nodes — questions, branching logic, HTTP side-effects, and workflow triggers — that guide a respondent from start to completion.
Overview
Unlike Workflows, which are triggered by events and run server-side in the background, Questionnaires are respondent-facing: a person answers each question in turn, and Flusso advances the session through the graph based on their answers. A questionnaire can be embedded in any web page or sent to a WhatsApp number, without requiring respondents to have a Flusso account.
Every time someone starts a questionnaire a session is created. The Responses column on the list page shows the total number of sessions for each questionnaire.
Session — one respondent's run through a questionnaire from start to finish.
Start node — the node where every session begins (marked with an amber border).
Completion node — the terminal node that ends the session with a success or failure message.
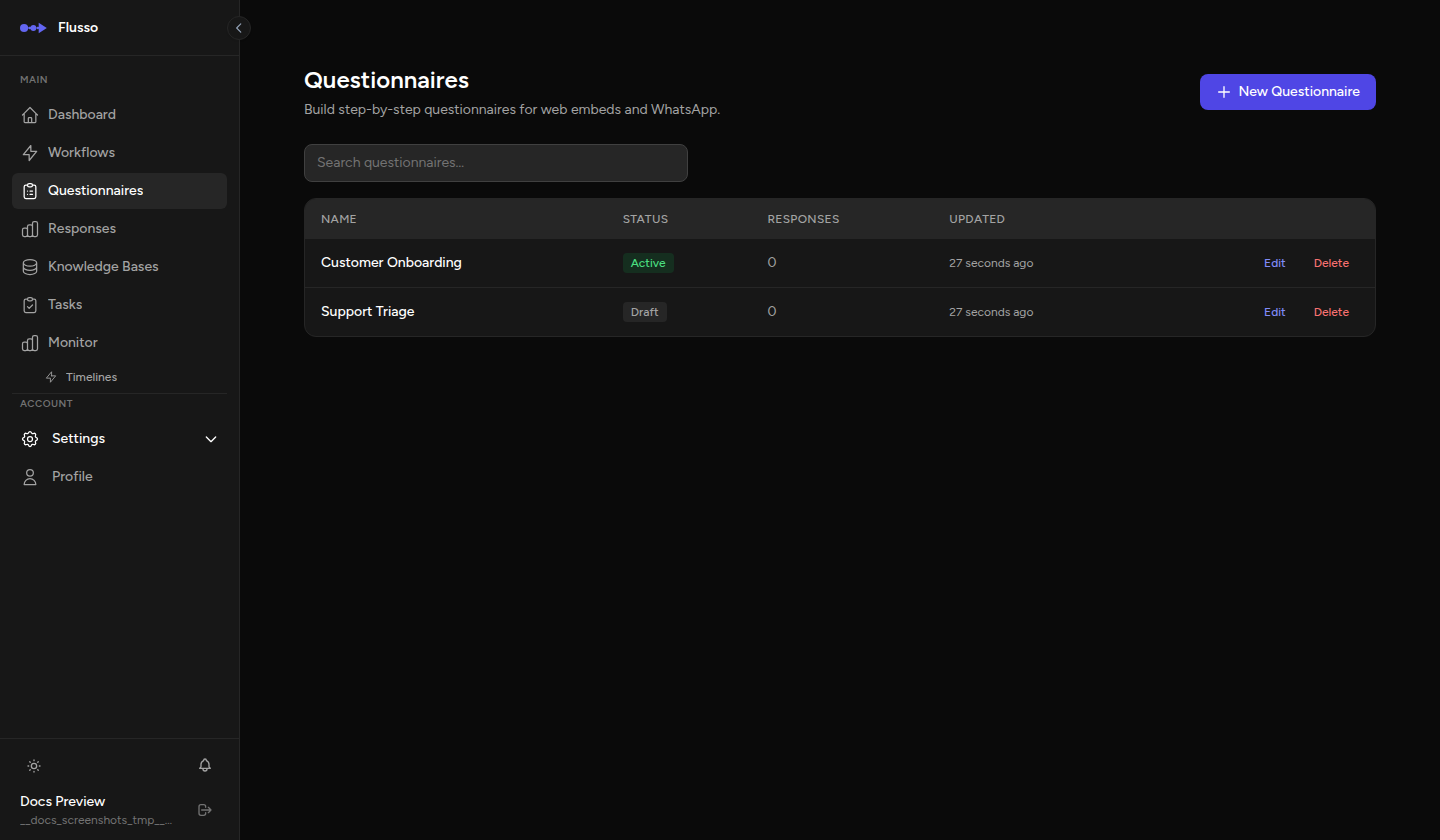
Questionnaire List Page
Navigate to Questionnaires in the left sidebar to see all your questionnaires. The list shows:
| Column | Description |
|---|---|
| Name | The questionnaire's display name. Click to open the editor. |
| Status | Current status: Draft, Active, or Archived. |
| Responses | Number of sessions started (each respondent creates one session). |
| Updated | When the questionnaire was last saved. |
Use the search bar at the top to filter by name. Click New Questionnaire in the top-right corner to create one.
Questionnaire Statuses
| Status | Meaning |
|---|---|
| Draft | Being edited. Not accessible to respondents; web embed is inactive. |
| Active | Live and accepting responses. Web embed works; WhatsApp delivery and AI Voice Calls are enabled. |
| Archived | Retained for reference but no longer accepting responses. |
Creating a Questionnaire
-
Click "New Questionnaire" The create dialog opens. Enter a Name (required) and an optional Description, then confirm.
-
The editor opens automatically You are taken directly to the graph editor for the new questionnaire.
-
Add a start node Drag a Question node from the left palette onto the canvas. Hover over the node and click the lightning bolt icon to mark it as the start node (amber border).
-
Build your question graph Connect question nodes with edges from answer ports. Add a Completion node at the end of each branch.
-
Save and activate Click Save in the top bar. Change the status selector to Active when you are ready to accept responses.
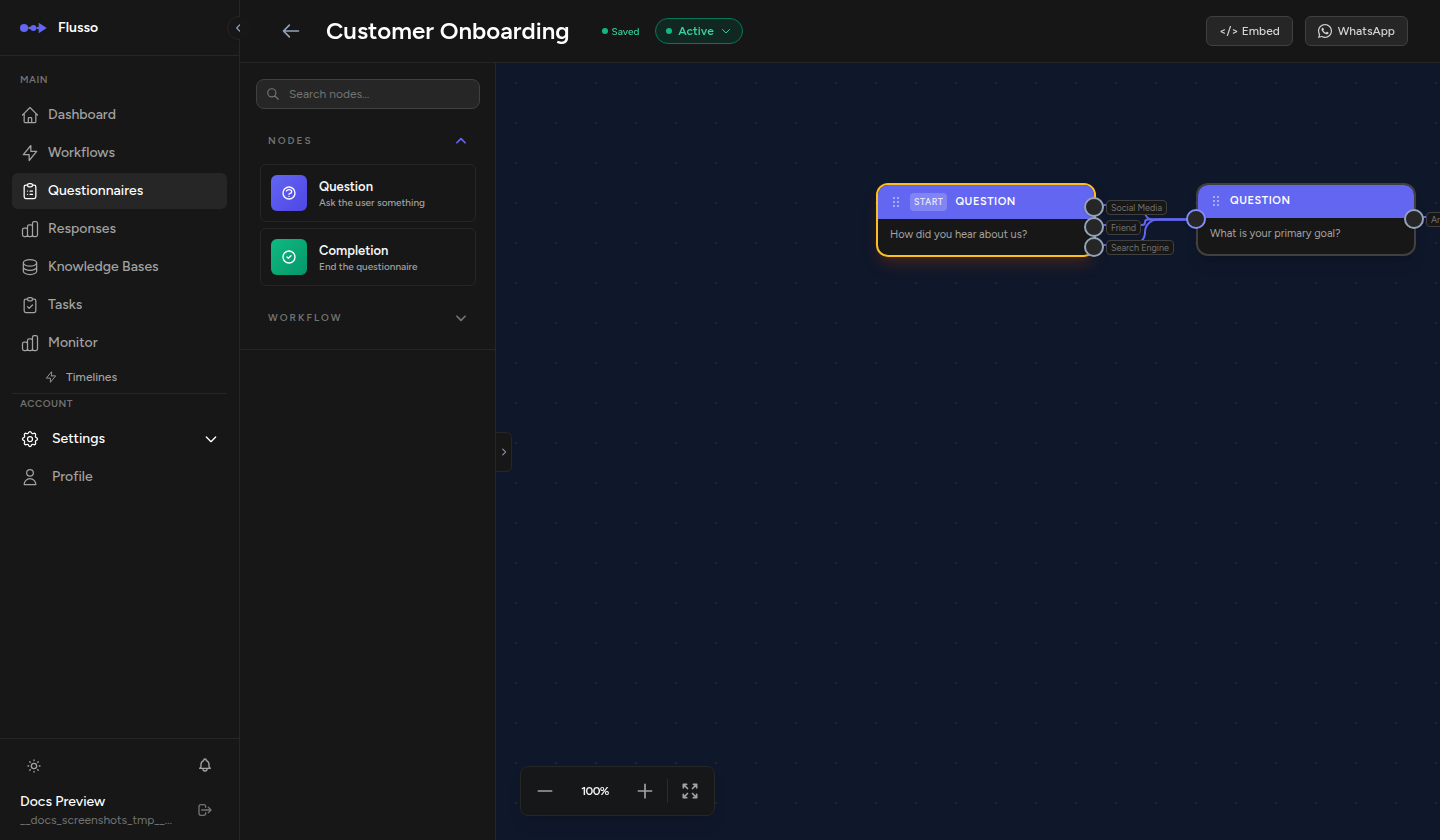
The Questionnaire Editor
The editor uses the same graph canvas as the Workflow Graph Editor: a pan-and-zoom dot-grid canvas with a node palette on the left and a top toolbar. The top bar also includes a Theme button that opens the Theme Editor, where you can customise the visual appearance of the web embed.
Top Bar
| Control | Description |
|---|---|
| Name input | Edit the questionnaire name inline. |
| Status selector | Switch between Draft, Active, and Archived. |
| Save | Persist all canvas changes. |
| Theme | Open the Theme Editor to customise colours, typography, and element styles for the web embed. |
| </> Embed | Open the Embed drawer to get the web snippet. |
| AI | Open the AI Configuration drawer to set the provider and classifier prompt. |
| Open the WhatsApp delivery configuration drawer. | |
| Voice Call | Open the AI Voice Call configuration drawer. |
Canvas Controls
- Place a node: Drag from the left palette onto the canvas, or click a palette item to place it at the canvas centre.
- Connect nodes: Drag from an output port (coloured dot on the node's right edge) to the input port of another node.
- Delete an edge: Click the edge to select it, then press Delete.
- Pan: Middle-click drag or right-click drag on empty canvas.
- Zoom: Ctrl + scroll wheel, or use the zoom controls in the bottom-left corner.
- Node actions: Hover over a node to reveal action buttons — configure (pencil), set as start (lightning bolt), clone (copy), delete (trash).
Setting the Start Node
Every questionnaire must have exactly one start node. Hover over the node you want to use as the entry point and click the lightning bolt icon. The node gains an amber border to indicate it is the start node. Every session begins at this node when a respondent opens the questionnaire.
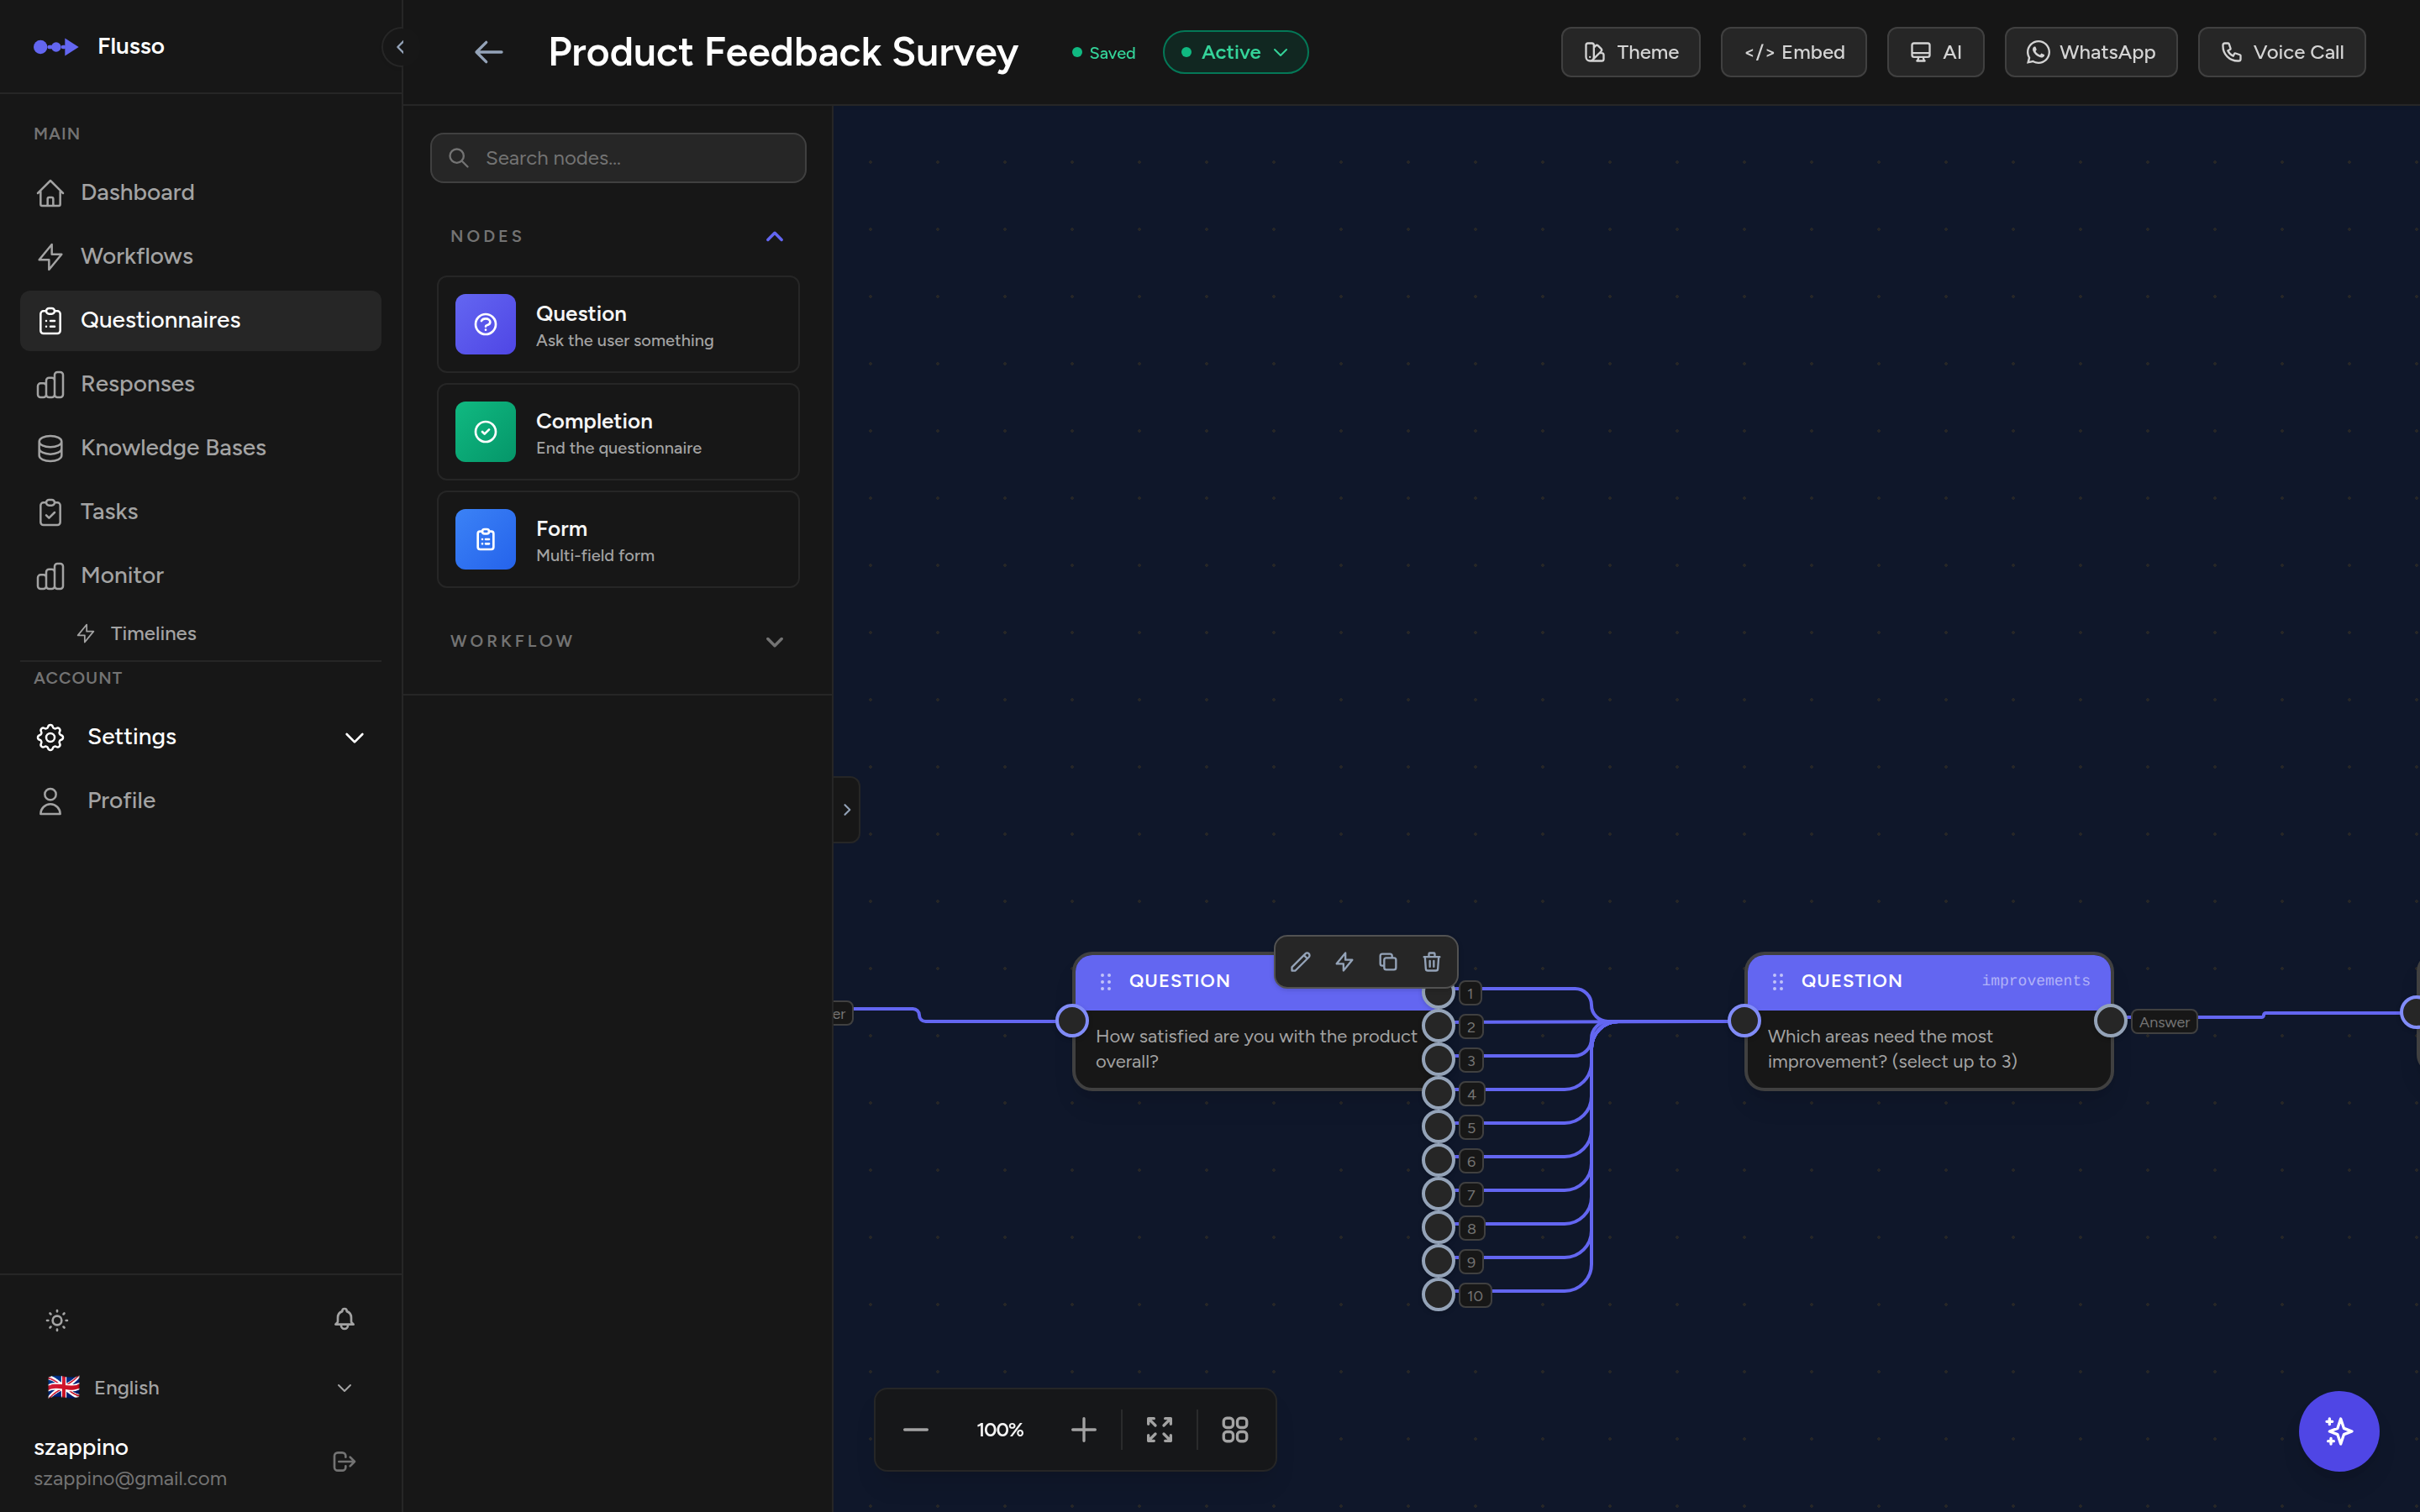
Node Types
Question Node
Presents a question to the respondent and waits for their answer before advancing. The node colour is indigo.
| Field | Description |
|---|---|
| Question text | The question shown to the respondent. |
| Answer type | Controls how the respondent answers and how output ports are generated (see below). |
Answer Types and Output Ports
| Answer type | Output ports | Notes |
|---|---|---|
| Boolean (Yes / No) | Yes, No | Two fixed ports. Connect each to a different branch. |
| Single Choice | One port per option | Define the list of choices. Each choice becomes a named output port. |
| Single Choice + Other | One port per option, plus Other | Same as Single Choice but adds a free-text "Other" port for answers that don't match any listed option. |
| Free Text | Answer | Single port. The respondent types a free-form response. When linked to an AI-enabled WhatsApp questionnaire, the AI provider interprets the answer. |
| Numeric Rating | One port per value (up to 10), or Answer | Respondent selects a number from a configurable Min/Max/Step range (e.g. 1–5). Displayed as horizontal buttons in the web embed. If the range exceeds 10 values, a single Answer port is used. |
| Multi-Select | Answer | Respondent picks one or more options from a checkbox list, subject to Min/Max selection limits. Selected keys are stored as a comma-separated string. |
| Validated Text | Answer | Like Free Text, but validates the input against a format: Email, Phone, or URL. Invalid entries are rejected with an error message. A format hint is shown in the web embed. |
| Likert Scale | One port per scale point | Respondent chooses from labelled scale points (e.g. "Strongly Disagree" to "Strongly Agree"). Each point becomes a named output port for per-sentiment branching. |
Attachments & FAQs
Question nodes support file attachments (up to 5 per node, max 10 MB each) and FAQ entries (up to 20 per node). Configure both from the question node's config drawer in the editor.
- Attachments: Images appear as a gallery above the answer controls in the web embed. Non-image files (PDFs, docs) appear as downloadable file cards. Allowed formats: PDF, JPG, PNG, GIF, WebP, TXT, DOC, DOCX. Files are cleaned up automatically when the node or questionnaire is deleted.
- FAQs: Displayed as a collapsible accordion in the web embed. On WhatsApp (Baileys), a Help button is added to the question — tapping it returns the FAQ text without advancing the session.
Completion Node
A terminal node that ends the session. Node colour is green. Every branch in your questionnaire graph must end at a Completion node.
| Field | Description |
|---|---|
| Status | Success or Failure — controls the icon and colour shown to the respondent. |
| Success message | Text displayed when the session ends successfully. |
| Failure message | Optional. Shown when status is Failure. |
| Redirect URL | Optional. After displaying the completion message, the web embed redirects to this URL. |
| Google Sheets Export | Optional. Automatically export all collected answers to a Google Sheets spreadsheet on completion. Requires a Google OAuth connection. Supports Auto mode (all answers as columns) or Manual mode (custom JSON template). See Node Reference → Completion for full setup instructions. |
HTTP Node
Makes an outbound HTTP request as a side-effect action when the session reaches this node. Node colour is amber. The request fires in the background; the respondent is not blocked waiting for it.
| Field | Description |
|---|---|
| URL | The endpoint to call. |
| Method | POST, GET, PUT, PATCH, or DELETE. |
| Body | JSON body sent with the request. You can reference session answers using variable syntax. |
Trigger Flow Node
Fires a Flusso Workflow when the session reaches this node. Node colour is purple. Use this to hand off data collected during the questionnaire into a full automation workflow.
| Field | Description |
|---|---|
| Workflow ID | The ID of the Flusso workflow to trigger. |
| Payload Mapping | Maps questionnaire answer keys to workflow input variables. Each mapping row is answer key → workflow variable name. |
Webhook Node
Sends a webhook notification to an external URL when the session reaches this node. Node colour is pink.
| Field | Description |
|---|---|
| Webhook URL | The destination URL for the POST request. |
| Payload | JSON body to send. Can include session answers via variable syntax. |
AI Configuration
Click the AI button in the editor top bar to open the AI Configuration drawer. This panel controls which AI provider is used for answer classification across all channels (WhatsApp and Voice Call).
| Field | Description |
|---|---|
| AI Provider | Select which AI provider to use for interpreting free-text answers. Choose any provider configured in Settings → AI Providers. Select "Use account default" to use your default provider. |
| Classifier Prompt | Optional custom prompt template for answer classification. Uses placeholders {{options}} and {{reply}}. Leave empty to use the built-in default. Click "Reset to default" to restore the original prompt. |

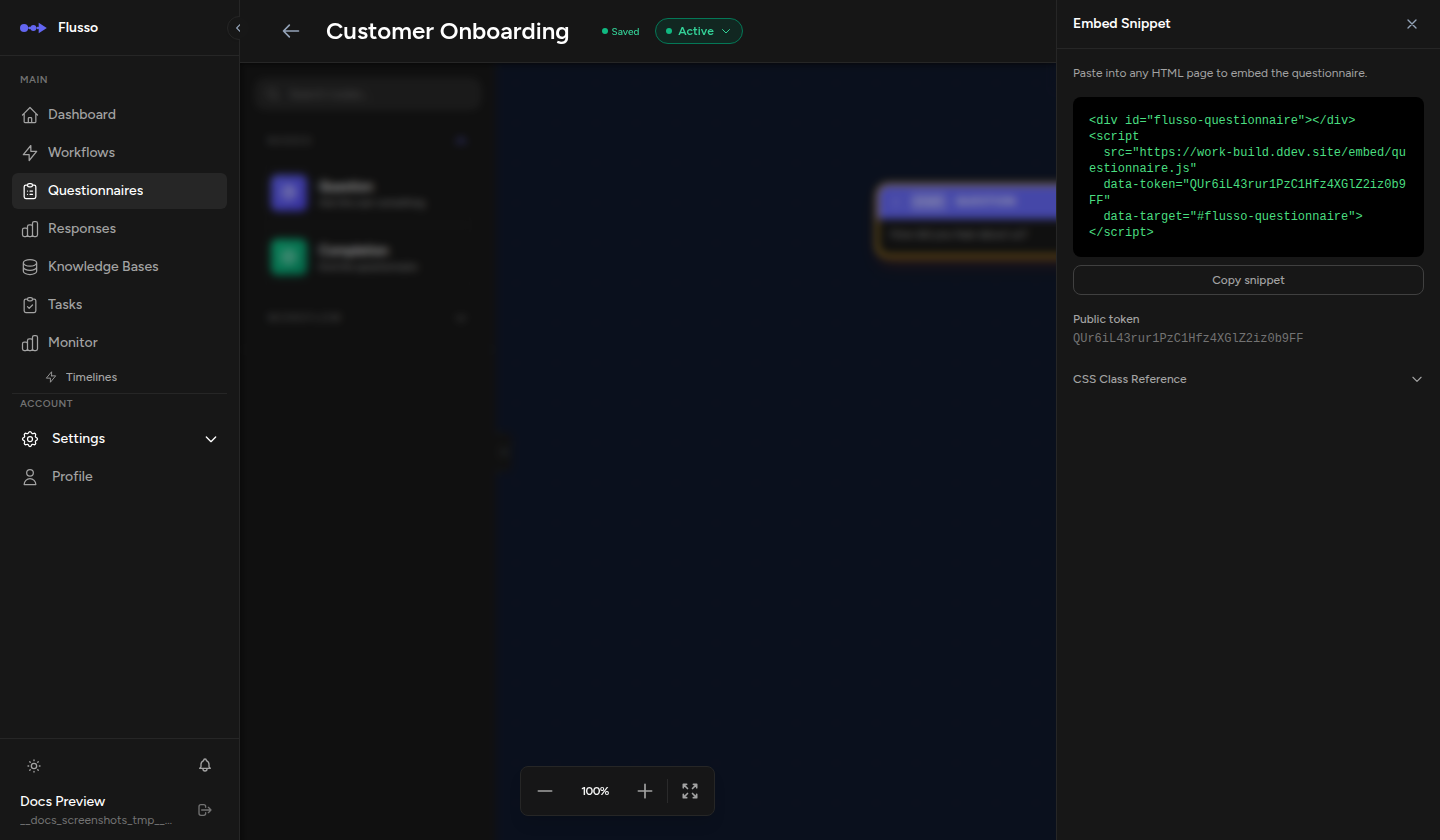
Web Embed
You can embed a questionnaire into any web page using a small JavaScript snippet. The questionnaire must be Active for the embed to work.
-
Open the Embed drawer In the editor top bar, click </> Embed.
-
Copy the snippet The drawer shows an HTML snippet. Copy it.
-
Paste into your page Add the snippet to any HTML page where you want the questionnaire to appear.
The embed snippet looks like this:
data-token is the questionnaire's public token. It is
safe to expose in client-side HTML — it only grants access to submit responses, not to read or
modify the questionnaire definition.
WhatsApp Delivery
Click the WhatsApp button in the editor top bar to open the WhatsApp configuration drawer. Flusso supports three delivery providers:
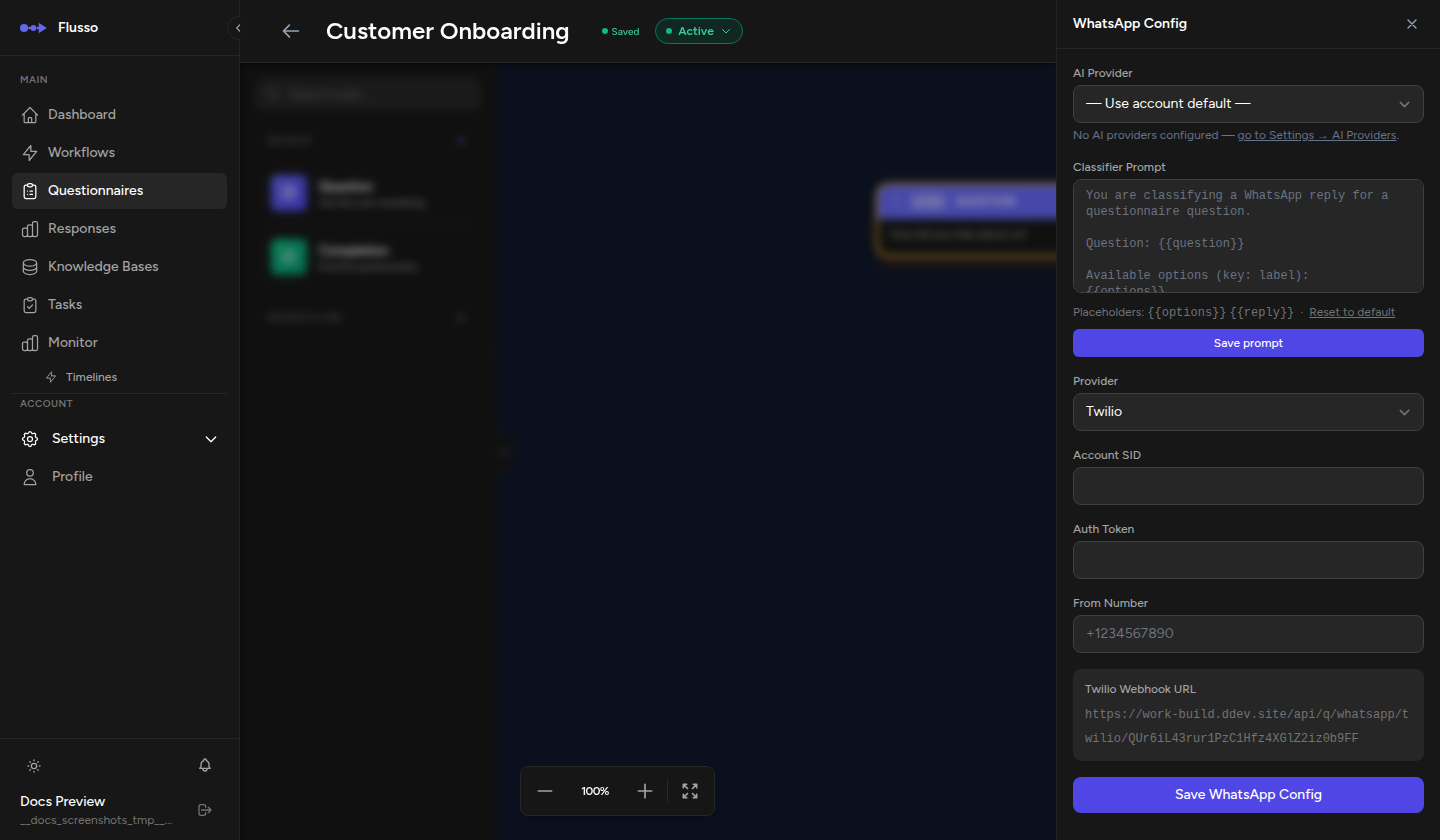
Twilio
Use Twilio's WhatsApp API for managed delivery. Twilio handles phone number provisioning and message routing.
| Field | Description |
|---|---|
| Account SID | Your Twilio Account SID from the Twilio console. |
| Auth Token | Your Twilio Auth Token. |
| From Number | The Twilio WhatsApp-enabled phone number in E.164 format (e.g. +14155238886). |
| Twilio Webhook URL | Generated by Flusso. Copy this URL and paste it into the Messaging webhook field in your Twilio console for the From Number. |
OpenClaw
OpenClaw is a gateway that routes WhatsApp messages to Flusso via a skill-based protocol.
| Field | Description |
|---|---|
| Gateway URL | The URL of your OpenClaw gateway instance. |
| Skill Bearer Secret | The bearer secret used to authenticate requests between OpenClaw and Flusso. |
| SKILL.md content | Generated by Flusso. Copy this and configure it in your OpenClaw instance's skill definition. |
| Test message panel | Send a test message to verify the connection before going live. |
Baileys (Self-Hosted)
Baileys is a self-hosted WhatsApp gateway that uses the Flusso WhatsApp Accounts integration. Unlike Twilio and OpenClaw, Baileys connects a real WhatsApp account directly — no third-party API account is required.
| Field | Description |
|---|---|
| WhatsApp Account | Select a connected account from the dropdown. Accounts are managed in Settings → WhatsApp Accounts. Only accounts with status connected appear here. |
-
Connect a WhatsApp Account Go to Settings → WhatsApp Accounts and pair a WhatsApp account. Wait for the status to become connected.
-
Select the account in the drawer Back in the questionnaire editor, open the WhatsApp drawer, choose the Baileys tab, and select the connected account from the dropdown.
-
Click "Save Baileys Link" The questionnaire is now linked to that WhatsApp account. Incoming messages to that number will be routed through this questionnaire.
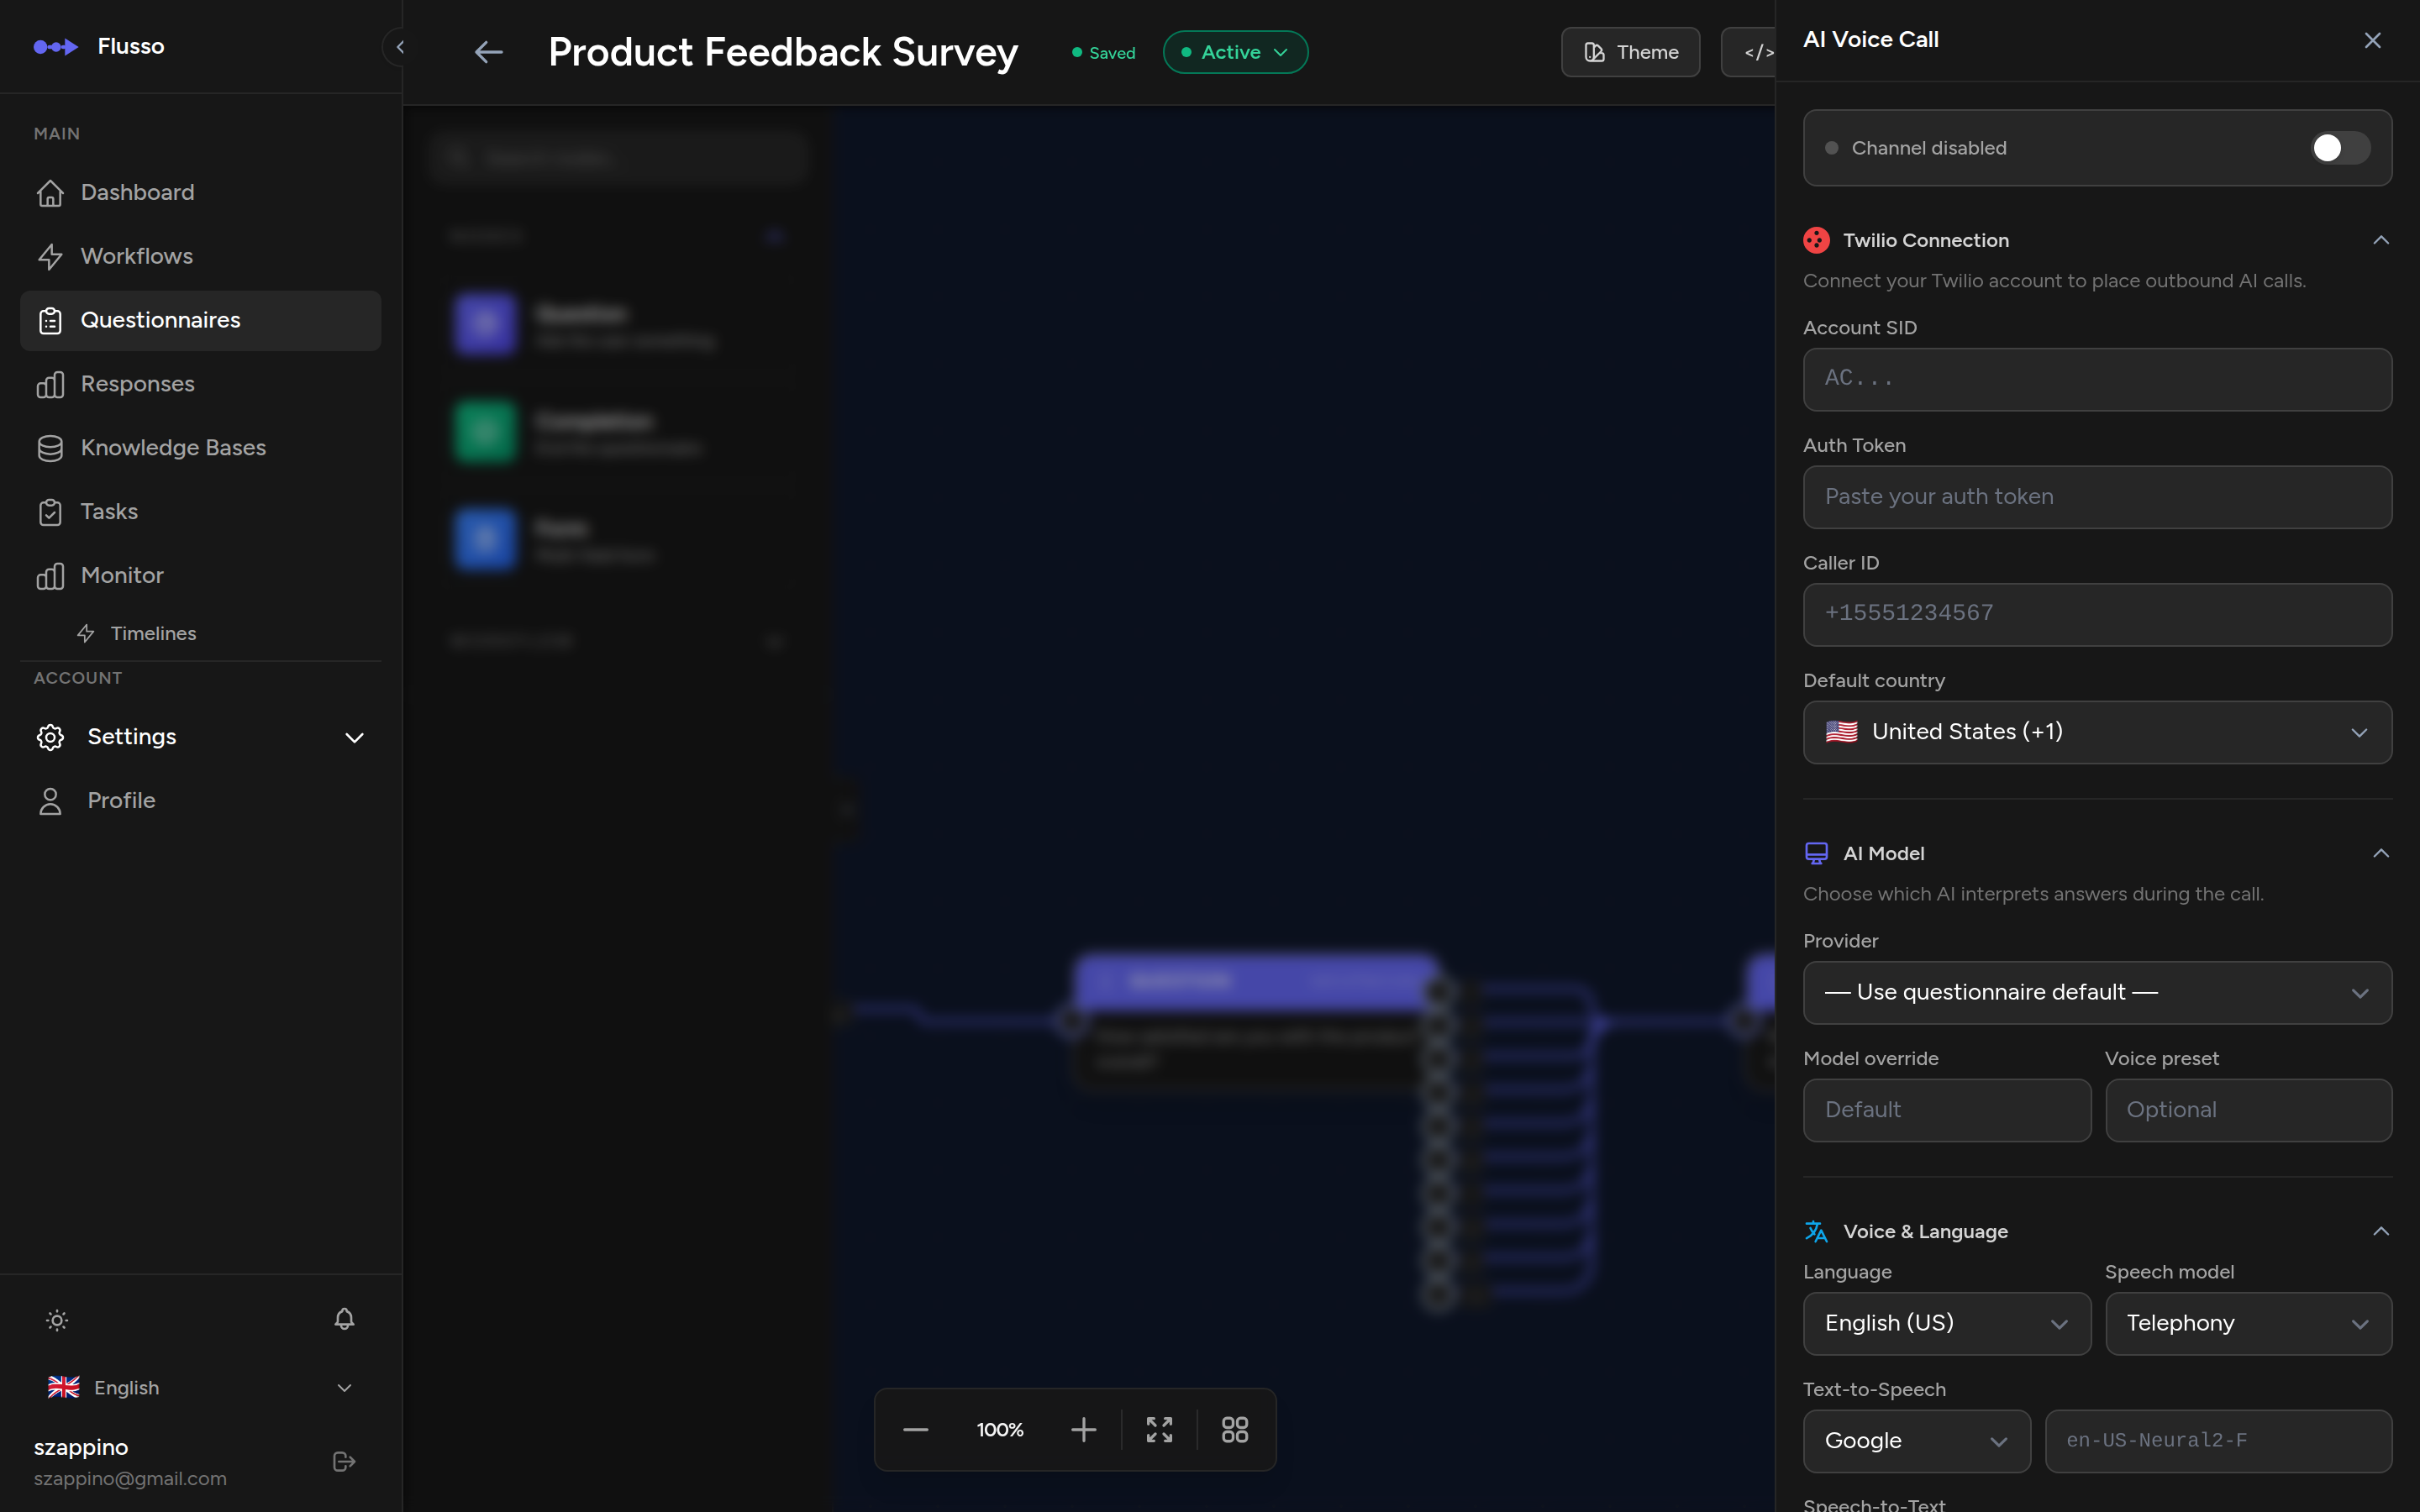
AI Voice Call
The AI Voice Call channel lets you conduct questionnaires over the phone. Flusso uses Twilio ConversationRelay to place outbound calls where an AI agent asks each question, listens to spoken answers, and advances through the questionnaire automatically.
Click the Voice Call button in the editor top bar to open the configuration drawer. The drawer is organized into collapsible sections:
Channel Status
A status bar at the top shows whether the voice channel is active or disabled. Toggle the switch to enable or disable the channel. The questionnaire must also be Active for calls to work.
Twilio Connection
Connect your Twilio account to place outbound calls. You need a Twilio account with a voice-enabled phone number.
| Field | Description |
|---|---|
| Account SID | Your Twilio Account SID (starts with AC). Found in the Twilio Console dashboard. |
| Auth Token | Your Twilio Auth Token. Stored encrypted. Leave blank when editing to keep the existing token. |
| Caller ID | The Twilio phone number to call from, in E.164 format (e.g. +15551234567). |
| Default Country | Default country code for outbound calls. Use the searchable dropdown with country flags to select. |
AI Model
Choose which AI provider interprets spoken answers during the call. This can override the questionnaire-level AI provider set in the AI Configuration drawer.
| Field | Description |
|---|---|
| Provider | Select an AI provider, or "Use questionnaire default" to inherit from the AI Configuration. |
| Model override | Use a different model than the provider's default (e.g. gpt-4o-mini for faster responses). |
| Voice preset | Optional voice identifier for the AI provider (future use). |
Voice & Language
Configure the language, text-to-speech (TTS), and speech-to-text (STT) settings for the call.
| Field | Description |
|---|---|
| Language | The language for both speech recognition and synthesis. Supports English, Spanish, French, Italian, German, Portuguese, Japanese, Korean, and Chinese. |
| Speech model | The STT model optimized for the call type: Telephony (recommended), Phone Call, or Default. |
| Text-to-Speech | Select the TTS provider (Google, Amazon, or Microsoft) and enter a specific voice ID (e.g. en-US-Neural2-F). |
| Speech-to-Text | Select the transcription provider: Google or Deepgram. |
Call Behavior Advanced
Fine-tune how the AI agent behaves during the call. This section is collapsed by default.
| Field | Description |
|---|---|
| Allow interruption | When enabled, the caller can speak while the AI is talking and the AI will stop to listen. Recommended for natural conversations. |
| Interrupt sensitivity | How easily the caller's speech interrupts the AI: Low, Medium, or High. Only shown when interruption is enabled. |
| Max retries | How many times the AI will ask for clarification before applying the fallback behavior (0–5). |
| Silence timeout | Seconds to wait for the caller to respond before re-prompting (5–120 seconds). |
| When caller can't answer | What happens after max retries: Read out all choices, Rephrase the question, Skip and move on, or End the call. |
Data & Privacy
Control transcript storage and retention. This section is collapsed by default.
| Field | Description |
|---|---|
| Save transcripts | When enabled, the full call transcript (agent and caller speech) is stored for review. |
| Auto-delete after | Number of days before stored transcripts are automatically deleted (1–365). Only shown when transcripts are enabled. |
Viewing Responses
The Responses column on the Questionnaires list page shows the total number of sessions created for each questionnaire. Each time a respondent opens the web embed, sends a first message via WhatsApp, or receives a voice call, a new session is created and the count increments.